Building Records in CONTENTdm Directly on the CONTENTdm Site
Note: This tutorial is also available as a video or PDF file.
I. Navigate to the CONTENTdm Administration Add Items Interface
- Open and log on to CONTENTdm Administration Site
- Click Items tab
- Make sure the collection you want to add records to is selected under “Current Collection”

- Click Add.

II. Building Records – Single Object
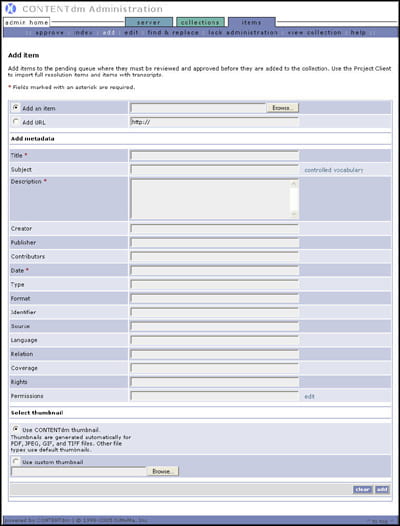
- Select whether you wish to add an item or a URL. Then, either enter the URL or use the browse buttons to navigate to the item that you wish to add.
- Add the metadata related to the item or URL. Required fields are designated with a red asterisk.
- If you are adding metadata to an item with a controlled vocabulary, you will see a link to controlled vocabulary adjacent to the field. Click Controlled Vocabulary to see a list of terms within the controlled vocabulary in a separate window. Enter a term from within that list of controlled vocabulary terms.


- Tip: Use CTRL+C and CTRL+V to copy terms from the controlled vocabulary window and paste them to the field with the controlled vocabulary. If you are adding terms that are not in the controlled vocabulary, you must approve the terms before the item can be approved (done during the approval process below).
- Select whether you want CONTENTdm to generate a thumbnail or whether you wish to use an existing custom thumbnail. If you are using custom thumbnails use the browse button to navigate to and select the custom thumbnail.
- Click Add. The item is added to the pending queue.
III. Approval Process
- Select the Items tab.
- Approval process consists of two steps:
- Approving Items
- Building the Index

Approving Items
- Click Approve from the Item Administration page. This opens a pending queue. Items that have been uploaded from Acquisition Station and are waiting for approval will appear on this page.
- New controlled vocabulary will appear at the top of the page. Click Add to accept the term and add it to the controlled vocabulary list.

- Click Edit to view the record. You can make changes in the descriptive metadata, if necessary.

- Click Approve at the bottom of the metadata record to add an item to the collection (This is also where you can select delete to delete an item rather than approve)
Building the Index
- Click Index under the Items tab to open the Index page. Building the index is the last step necessary to finish adding items to the collection.
- Click Index now. This process may take a few minutes. When indexing is complete, the message “Index build successful” appears.
View New Items
- Click View Collection from the Administration page menu.
